
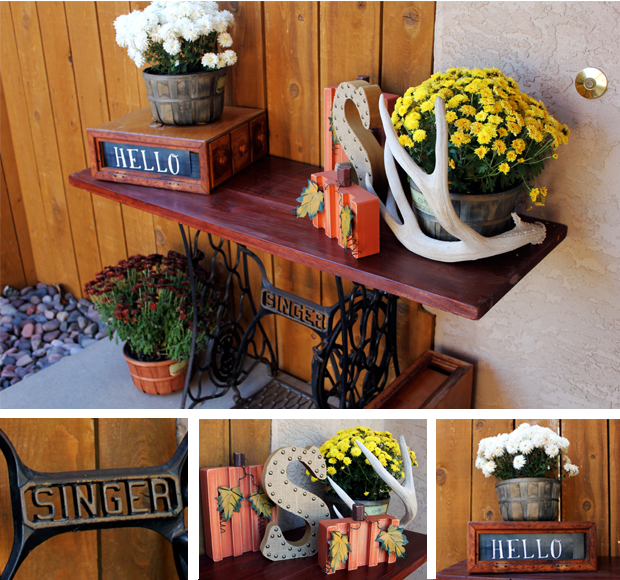
Fixing up an old singer sewing treadle, and turning it into a more functional table, has always been on my list of things to do. I love the idea of taking an antique, something previously loved with history, and turning into a more modern, purposeful piece.
Finding Your Sewing Treadle
Finding your treadle base is the most important part of creating your table–after all, you can’t make a sewing treadle table without the actual treadle. Treadles are no stranger to swapmeets, garage sales, estate auctions and even ebay. Also, you’ll have a lot easier time finding these across the east coast and Midwest–trust me on this one! How much you want to spend and the condition of the base is completely up to you. I’m always out for a deal and was quite happy with a 1920s Singer I found on Craigslist for $99 with free delivery.
Items you’ll need to make your own table:
Sewing treadle base (with or without the original wood top/sewing machine portion)
Wood plank for table top
Flathead screwdriver
Wood stain – you chose the color!
Polyurethane
Old rags
Paint Brush
Drill
Screws
Removing The Original Top From the Base
Now that you have your table, the first thing you’re going to have to do is carefully remove the original sewing machine top from the base. I say remove carefully, because I think it is important to keep intact the top portion as well–even if you personally don’t want it, donate it. It is a piece of history after all, and someone will certainly treasure it!
Flip the table on its head so your treadle base has it’s legs up in the air. Using your flathead screwdriver, you will need to separate the base from the table top by unscrewing it in four places. There is a lot going on with the table top, so finding these screw ins may be tricky to find. See the arrows on image right to see where the screws that need unscrewing are located. Note: These screws have been holding tight for a 100 years, sometimes even longer! Lefty loosie elbow grease will be required to pop these bad boys out.
Now that the screws are out, you should be able to gently pull free the treadle base from the top. You may need to hold the top down and wiggle the base a bit to get it to come apart. Once your base is free, we recommend a good treadle cleaning. Soap and water will do wonders for your treadle base.
Creating Your Table Top
When I envisioned my treadle table, I pictured a rustic wood that my holiday patio decorations would look adorable atop. But you don’t necessarily have to use wood. I’ve seen glass, granite and even concrete. Chose whatever matches the rest of your home décor or in my circumstance, your holiday knick-knacks. For this how-to purpose, we’re going to stick with wood.
I was originally going to take a bunch of old barn wood and piece it together to make something unique, but while buying my stain at the local hardware store, I noticed a pre-cut slab in the exact size I was wanting. For only $30, I was much happier with this work-free substitute!
For a wood top, sanding is going to be involved. Boo-I know. I’m lazy so I start with a low grade sand paper (60-100) removing the rough top layer, and then finish the job with a 220 grit fine sand paper, giving it the smoothness you’re looking for.
Once sanded down, you’re good to stain. Chose the stain that works best for you and follow the directions on the container. Generally you’ll need one or two coats and plan on drying time, between coats and for the final dry. You’ll want to let it dry completely before applying your top coat. Apply your polyurethane and sand as directed.
Fastening Your Treadle Base to Your New Top
Once your table top has been stained, clear coated and dried, you’re ready to attach your table top to your base. Take your newly stained table top and lay it flat on the ground, stained side down. Take your treadle, flip it over so the legs are pointed up, and place it atop your wood plank. Remember the screws you had to remove to pull apart your treadle from the original top? Well, those holes, where the screws used to be on your treadle, are going to be your new best friend. Align the treadle exactly where you’d like it with the table top, and using the screw hold, mark with a pencil on your table top where the holes are located. You are going to use those four pencil marks as your drill points. If you’re lucky and the screws you pulled from the sewing machine are in good shape, you’ll be able to repurpose them as the screws you’re going to use to fasten your table top to your treadle. Drill your holes in your pencil marked spots and then use your screw driver to drive the screws into your treadle base. Tighten washers to the ends of your screws so your top holds in place, making it stable. Your table top should now be securely fastened to your treadle and shouldn’t wiggle or wobble. You want a nice, secure fit!
